ODYSSEY INSTRUCTION MANUAL Section 3
VIII. TINNING
TOOLS REQUIRED
 Soldering Iron (100W to 250W)
Soldering Flux (paste only)
Flux Brush
Solder (50-50, solid wire)
Lamp Leveling Device (Optional)
Before beginning this step, be sure you will have time to complete the tinning of both the outside and inside of the shade within a day or two. The flux you are applying is corrosive to the copper foil in your lamp and will eventually produce a green encrustation that is difficult to solder through. Even though you are working on the outside of the lamp, some of the melted flux will get through to the inside. The inside must be tinned before it corrodes, so don't even start soldering if you are going to have to leave even part of the lamp un-tinned on the inside for any length of time.
IMPORTANT NOTE: If your lamp tucks in at the bottom (such as the 14" and 16" cones, 18" and 22"turbans, 22" Dragonfly, etc.), please read the special instructions on soldering tucked shades at the end of this section before proceeding further.
Begin by brushing the outside foiled areas of the shade with paste flux. A paste flux is strongly
Tinning the Shade
recommended because it does not contain water which will cause sputtering and bubbles. Don't be skimpy with the flux; too much is better than too little and you can always wipe the excess off later. Next tin the entire outside with solder, using the largest soldering iron you have. You want the solder to penetrate all the way through to the inside of the shade, so the more heat the better. We recommend a 250 watt iron if you have one - and also the muscles to hold it! Penetration of the
Beading the Shade
solder at this stage is important to provide strength to the shade, and also to prevent air pockets from being created inside the lead lines. Air pockets will cause sputtering and bubbling when you go on to solder the inside of the shade, due to the water and/or oils that get trapped in them. Water-based fluxes are especially prone to sputtering and, for this reason, should be avoided. Don't try to bead the outside of the shade at this time. It is best left until later.
The ring can also be attached in at this point, if it is in the correct position. Make sure that it is resting level on the bottom of the ring cavity, and
is centered vertically against the edge of the glass. If the glass at the aperture is thick or uneven (for example, ripple glass), you may need to raise the ring to center it. Since you can't be sure it's level, installation will have to be postponed until after the shade is off the mold. If, on the other hand, the ring is correctly positioned, go ahead and tack it on at three or four joints, but do not attempt to solder it in all the way around at this time.
If your shade has an irregular lower border, you can also install the rim wire around the lower edge before the shade is removed from the mold. 12gauge copper wire is best for this purpose, although a higher gauge (thinner wire) is acceptable. First remove any solder drips protruding out from the lower edge of the shade, so the wire will fit flush against it. Begin the wire at a joint nearest the highest point in the rim, attaching it at the joint with solder. Use a pair of needle nose pliers to help bend the wire around intricate curves. Keep it as flush as possible against the edge, but do not cut the wire at angle points. A tight curve is preferable to cutting the wire, which will weaken the integrity of the rim. Connect the wire only at solder joints as you proceed around the shade, until the entire rim is in place. Then go back and tin the rim to the edge foil, without beading.
IX. RELEASING THE SHADE
To release the shade from the mold, it must be heated to about 150°F all over to soften the wax sufficiently. In most cases, this can be accomplished with a common hair dryer of 1000 watts or more. The hair dryer is used at full power and moved about continuously over the surface of the shade, keeping it about 4" from the glass to avoid overheating. Glass can crack from heat shock, so patience is advisable. Don't be surprised if it takes 20 to 30 minutes on a large shade to get it warm enough to release. The wax does not have to be dripping out the bottom, but the glass must be quite warm to the touch over the entire surface. When the shade is hot enough, gentle pulling should release it. It's easier if you get some help to do this; one person to hold the mold down in the center, and the other to lift the shade from the rim edge on both sides. If you are using a lot of pressure and the shade still won't release, it's not warm enough yet.
This process of releasing the shade can also be facilitated or replaced by other means of heating. First of all, making the mold as warm as possible before you begin with the hair dryer can save a lot of time. Put it in a black garbage bag and place it next to the furnace or out in the sun for about an
Releasing the Shade from the Mold
hour. Another option is to place a large light bulb or heat lamp inside the mold, and then cover the outside with old towels or other insulating material to speed up the process. These procedures are sometimes enough by themselves to release the shade.
With smaller shades, an ordinary kitchen oven is ideal. Place the shade on a cookie sheet or aluminum foil in a cold oven, and set the thermostat to 200° F. Check it every few minutes and, when it becomes warm to the touch, remove it
from the oven. Remember that the solder melts at less than 400° F, so don't let it overheat! The large surface area of the bigger shades sometimes presents a more difficult problem.
Occasionally, all of the above techniques won't work and more persistent heating methods are required. We have found that, all else failing, it may be necessary to construct an oven, big enough to fit the shade inside. We suggest using a large card-board appliance box, insulated with old blankets and heated with a hair dryer or electric hot plate. When patience is added, this always works!
MENTAL HEALTH WARNING !!!!
If you have been trying for over an hour to release your shade from the mold, and it just won't come, please do not become impatient or violent. You might well be in an emotional state that could result in serious damage to your lampshade. It's time to take a mental health break and reconsider this operation. It's helpful to first reflect on the fact that tens of thousands of other people have successfully accomplished this task before you, so you know that it's do-able. Then drink a cup of herbal tea or eat some chocolate and reread these instructions - SLOWLY. If they still don't provide the answer you are looking for, please call our ODYSSEY HOTLINE at 1 (800) 403-1981.
As soon as the shade is off the mold, check the exposed edges at both the top (if the ring isn't already attached) and bottom to see that the foil has not pulled away from the glass. It should be pressed back up against the glass before the wax has solidified, or you will have to replace foil. Next wipe the wax off the mold using paper towels. Again, this is much easier to do while the wax is still soft. Do not attempt to clean any wax off the inside of the shade at this time.
X. INSTALLING THE RIM AND RING
TOOLS REQUIRED
Straight Edge
Ruler
Hacksaw
Scewdriver
If the rim and/or ring are not already installed, this should be done as soon as the shade is removed from the mold. They will not only make the shade stronger, but will protect the edges during subsequent handling. Install and/or level
the ring first. Remove any solder drips from the edge of the rim, so the shade will sit flat on a table. If the ring is not already attached to the shade, position it in the shade at the correct height and tack it in three places at joints approxi-mately120° apart. For 2", 3" and 4" rings, the upper edge of the ring should protrude slightly above the outer surface of the lamp, so that the majority of the ring depth remains on the inside of the shade. For 5"and 6" rings, the glass should rest against the lower surface of the bead around the ring, with the long flange of the ring facing downward. The foil on the outside aperture edge should be widened so that its edge is directly below the edge of the ring bead.
Before completely soldering the ring into the shade, it should be checked for level. You will need a straight edge longer than the diameter of the shade and a ruler taller than the shade. Place the center of the straight edge across the top of the ring and measure its height above the table on both sides of the shade. Note where it is high and low, and the difference between the two measurements. Rotate the straight edge 90° and repeat your measurements. If the difference between measurements is less than 1/16" across the shade, you can assume the ring is level in that direction. If the difference is greater than 1/16",
Leveling the Ring
loosen the appropriate solder joint (one at a time!), raise or lower the ring, and reattach. Repeat your measurements, and readjust until the difference is less than 1/16" in all directions. Then double check yourself by taking another set of measurements at 45° from your last set. If you're satisfied that the ring is level, solder it into the shade all the way around, both outside and inside.
Now that the top edge of the shade is secure, the same must be done along the lower edge. If your shade has an irregular lower edge, this should already have been accomplished while the shade was still on the mold. If you forgot to attach
Leveling the Rim
the rim wire at that time, do it now. (see instructions at the end of Sec. VIII). If your shade has a flat lower edge, its circular Odyssey rim should be attached now. First check it to be sure it is flat, circular and longer than the circumference of the shade. Hand bending will usually take care of any minor irregularities.
Place one end of the rim midway between two adjacent joints and solder it to the edge of the shade at the first joint. (Wooden clothespins are helpful to keep the loose rim in position atop the edge of the shade). Move down another 3" to 4" and attach it at another joint. Continue to attach the rim at joints 3" to 4" apart all the way around
Attaching the Rim
the shade until you can tell where the end of the rim should be trimmed off to meet flush with the other end. Use a hacksaw to cut off the excess rim wire. Attach the rim to itself (but not to the foil below), and check to see that a slight angle is not created at the joint. Next place the shade right side up on a level surface and note where the rim raises up off the table. In the high areas, melt the solder attachment with your soldering iron, push the rim down with a screw driver until it touches the table, and reattach the joint. Repeat this process
until the entire rim is flush against the table. This will insure that your rim will be level. Now you can completely solder it onto the shade, both inside and out.
XI. FINISH SOLDERING
After the rim and ring are installed, you can go ahead and complete the soldering of the shade. We recommend that you tin and bead the inside before beading the outside. Beading often produces solder drips on the other side of the shade that are easy to miss. If the outside is beaded last, these drips will be hidden where no one is likely to spot them.
The bulk of the wax left on the inside of the shade can be removed while tinning. As you solder, the wax will melt and form a pool which can be soaked up with tissues. A small amount of wax will not interfere with the flow of solder onto the foil. Any residue can then be completely removed during beading.
If the shade is larger than 22" in diameter, reinforcement wires should be added to the inside for extra support. 12 or 14 gauge copper wire is best for this purpose. Use 3 to 6 wires (depending on shade size), running along lead lines all the way from the ring to the rim. About 1/2" of wire is
soldered up against the ring after which it follows the lead lines down to the lower rim of the shade This is best done after the shade is tinned, but before beading because you want the wires to sit flush against the foil.
Beading deserves special attention because a lot of people seem to have trouble with it. Use a some-what smaller iron, between 100 and 175 watts, as you need control rather than heat to bead. Provision must be made to hold the lamp steady at all angles, so that you will always be soldering on a horizontal surface. Reflux all the lead lines to be beaded, even though there is a lot of flux left from the tinning operation. Keep the area that you are working on horizontal or the molten solder will flow toward the downhill side, creating a bump or seam.
The trick to beading is using the right amount of solder with the right amount of heat for the right length of time. Too much solder will create a high bead that is hard to control. A good bead should be less than 180° of curve, somewhere in the range of 120° to 140°. You want to apply enough heat to melt the lead line from 1/8" to 1/4" on each side of the soldering tip, but not so much so that the solder sinks through the lead line to the other side. You also want to leave the iron on the bead long enough to get the solder hot so it won't
Attaching an Irregular Rim
"peak" when you pick it up, but no so long as to cause the solder to sink through. Often enough heat is provided by using only the corner of the tip on the edge of the bead. Work along the lead line, so the adjacent area is still hot and will blend with the area you are working on. This requires a good deal of patience at first, but, with practice, it will become easy.
When beading along the rim and ring edges, go all the way around at one time. The larger metal masses here create a "heat sink" that is impossible to bead when cold. Don't be concerned if the bead is a little rough up against the brass rim or ring as these areas will be filed and sanded
later. Pay more attention to how it looks on the foil side, particularly where it blends into the lead lines.
XII. FINISHING
TOOLS REQUIRED
File 120 Grit Emery paper
Kerosene Cleanser
Scrub Brush Patina Solution
After the beading is finished, the shade is cleaned to remove all traces of wax and flux. The wax is difficult to remove with ordinary cleaners, but warm (not hot!) kerosene does a very efficient job. Warning! Kerosene is very flammable and should not be heated above 150°F. Use adequate safety precautions! Heat the kerosene until it is only warm to the touch, and use a small scrub brush to apply it, going over the shade several times. Next apply a chlorinated cleanser (Comet, Ajax, etc.) with water, and again SCRUB thoroughly. When you are through, the shade should be "squeaky" clean.
Finally, the rim and ring are filed to remove any excess solder. A single-cut file is preferable, because it will not load up with solder as easily as a double-cut file. The lower third of the rim should be filed down to the brass and the edge blended into the bead.
The top of the ring should also be filed down to the brass and the inside and lower surface of the ring completely cleaned of any solder. All filed surfaces are then sanded with 120 grit emery paper to remove any file marks and smooth the surface. This can be followed by 200 grit if you want it to be very smooth.
Patinating the shade is a matter of taste. Many excellent commercial patinas are available that provide a variety of finishes. Use one that will work on brass as well as solder. If the patina does not seem to take to the metal well, you probably have not done an adequate cleaning job. Go over the shade again, being especially vigorous with the cleanser. It contains pumice, which imparts a "tooth" to the metal, making it more receptive to the patina. Finish your lamp with a good coat of paste wax to seal the patina and give it a pleasing shine.
XIII. SPECIAL TECHNIQUES
Soldering Tucked Shades
A tucked shade is one that curves more than 180° vertically across its surface. In other words, it tucks in at the rim. Shades in this category include the 16" cones, the 18" and 22" turbans and the 22" dragon-fly. A tucked shade cannot be
removed from the mold if all the lead lines are tinned. To release, it must be left in two separate pieces much like the shells of a walnut. This is accomplished by leaving an unsoldered seam around the entire circumference of the shade at its widest point (the equator, so to speak). No part of this seam can be bridged by solder if the shade is to be removed from the mold. Before fluxing the outside of the shade, determine where this seam should be and mark the glass on both sides with a felt pen. The marked glass will help you to remember where the seam is while soldering.
When the shade is ready to be released from the mold, you may need some tool such as a large screwdriver to separate the two sections enough to get your fingers in between. As soon as the two sections are removed from the mold, press the foil back down along both sides of the seam and solder the two halves together. It is wise to first tack them only at several joints around the shade to be sure the halves line up correctly before soldering them completely together. Once the shade is in one piece, proceed with installing the rim and ring.
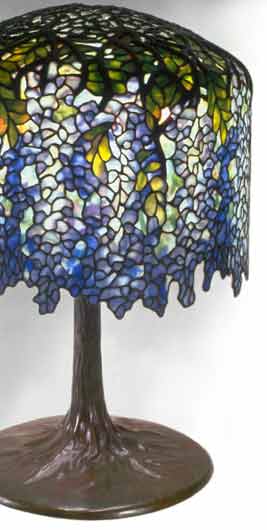
Wisteria Crown and Branch Set
The Odyssey Crown is an exact copy of the original Tiffany casting, designed to be used on
Crown Installation in an Original Tiffany 18" Grape Shade

the T342 Wisteria, T347 Apple Blossom, T348 Grape and T346 Trumpet Vine. You might need to do some clean-up on the holes in the crown with a rattail file to make them smooth. The crown should be tinned around the outside edge to make it easier to solder to, and then positioned correctly on the mold. It will not match the lines on the mold exactly, due to differences between the repeats in the original Tiffany crown casting that we copied.
The Wisteria and Apple Blossom also require lead branches, which must be soldered to the crown before any glass is put onto the mold.
Because these branches are thicker than the crown, the crown should be propped up with balls of Tacky Wax until its surface is flush with that of the branches. The first branch is soldered securely to the crown in its correct position with a large soldering iron. Then a soft hammer is used to gently tap it down over the shoulder of the mold until it is flat against the mold. As you do this, you will need to bend the branches to one side or the other to get them aligned with the engraved lines on the mold. The branches are the correct length for the Wisteria, but for the Apple some of them must be shortened with a pair of lead nips. Repeat this same process with the other 14 branches that butt up against the crown. Then when you are ready to fit, remove the entire assembly, and coat the mold with Tacky Wax.
Filigree
Odyssey filigree is identical to that used on original Tiffany lamps. In most cases it is applied to the outside of the shade, the exception being the leaves on the 17" and 20" Poppy cones, where the leaf filigree may, as an option, be soldered to the inside. Because both the Poppy and Dragonfly filigree were designed by Tiffany to fit more than one size shade, they sometimes must be trimmed off on one side to fit correctly. Attach them only
Filigree in an Original Tiffany 26" Poppy Shade (non-standard)
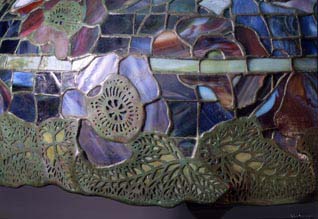
after the shade has been tinned on both sides. If there are lead lines underneath the filigree, they should be beaded before the filigree is applied and the filigree should not be attached to them.
The Dragonfly wings are long and flat, but rest against a curved surface, so they will naturally protrude above the surface of the mold at both ends. In preparing these shades for soldering, we push the wings in a little bit (but not all the way!) at the end touching the body and raise the body with balls of Tacky Wax so the whole area is flush. This raises the other end of the wing even further above the surface of the mold. Because the intersecting wings on adjacent dragonflies are not the same length one is chopped off because the
other one covers it, the full wing will protrude considerably above the chopped wing, sometimes as much as 1/4". This gap must be filled in with a thin wall of solder and beaded smooth on both sides. Our experience (and Tiffany's) has found that this wall is awkward to produce when it is vertical, so we have left a gap between the two wings on the pattern, giving the wall a distinct slope. This makes it easier to solder.
The filigree on the full "overlapping" wing is attached to the lead line around its periphery except where it meets the body, and, at its end over the body is attached to the other filigree. The filigree for the underside wing must be trimmed, and the trimmed edge soldered to the side of the filigree on the overlapping wing. Because the overlapping wing stands out from the wing it covers, the underneath filigree will therefore bend away from the glass to attach correctly, completely covering the sloped wall. During the finishing of all filigreed lamps, the bead around the edge of the outside filigree should be filed down on top until it is flush with the surface of the filigree. Any file marks can be removed with sandpaper. END
Return to Section 1
Return to Section 2
Special Instruction Sheets
Here are links to several special instruction sheets that deal with some of the trickier challenges attendant to specific Odyssey shade models. We have designed them in an 8½" wide format, so that they can be conveniently printed for future reference.
• Installing Turtleback Tiles (T1434)
• Applying wires to the Lotus Bell (T422)
• Using Architectural Linen
• Installing Pony Wisteria Crown